At a pedestrian rail crossing, the detectable warning surface is only one part of the safety picture. The route leading to the tracks, the location of gates, the crossing surface, approach grades, and the path on the other side all have to work together. A warning surface can be correctly specified, but if those surrounding details are not properly coordinated, the crossing may still be difficult to use.
That makes rail crossings a good example of why detectable warnings should be planned as part of the complete pedestrian route, not treated as an isolated tile detail. Here are the key decisions to work through early in the design process.
Start by Identifying the Type of Crossing
Before determining where a detectable warning belongs, first establish what kind of crossing you are working with. Is the pedestrian route crossing the tracks on a separate path, or are the tracks located within a street crosswalk? That distinction changes how the warning surface is addressed.
Under the Access Board’s Public Right-of-Way Accessibility Guidelines (PROWAG), detectable warning surfaces are provided on each side of a pedestrian at-grade rail crossing that is not located within a street. When the rail crossing falls within a street crosswalk, an additional detectable warning immediately adjacent to the rail is not called for; the curb ramps or blended transitions at the street crossing address the street boundary.
This is an important distinction to resolve before the tile layout is developed. It helps avoid treating every rail crossing as though it requires the same detail. The project team should also confirm which accessibility requirements have been adopted in the jurisdiction and whether the rail owner or local agency has additional criteria.
Coordinate the Warning Surface with Gates and the Walking Route
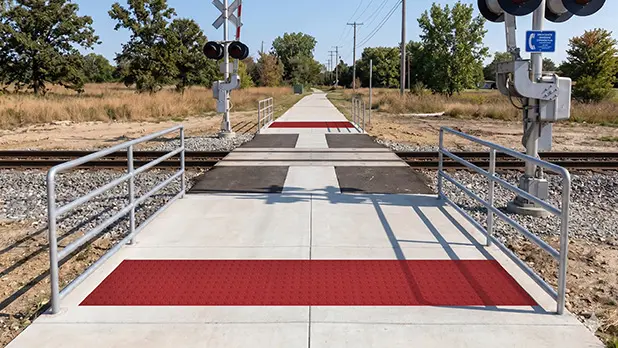
For a qualifying crossing outside a street, PROWAG places the nearest edge of the detectable warning surface 6 to 15 feet from the centerline of the nearest rail. If a pedestrian gate is present, the warning surface is located on the side of the gate opposite the rail.
Those dimensions matter, but so does what happens around them. A gate, sidewalk edge, change in grade, or constrained approach can affect how comfortably someone reaches and moves through the crossing. These relationships are much easier to resolve on the plan than after construction is underway.
Trace the pedestrian trip in both directions. Where does someone approach the crossing? Where will they wait if a gate is down? Once they cross the tracks, is the continuation of the pedestrian route obvious? Looking at the full trip helps make sure the warning surface connects to a usable path rather than simply occupying the correct spot on a drawing.
Detail the Warning Surface as Part of the Approach
At a qualifying pedestrian rail crossing, PROWAG calls for a detectable warning surface with truncated domes at least 24 inches deep in the direction of travel and extending the full width of the pedestrian walkway. The project detail should show more than those dimensions. It should also make clear how the warning surface meets the surrounding pavement, where joints occur, and how the installation fits the construction sequence.
That last point is especially useful when selecting the installation method. New concrete and an existing concrete approach present different conditions. A wet-set system can be coordinated with new concrete placement, while a surface-applied system can be considered for an existing sound concrete surface after the substrate has been evaluated.
TufTile offers galvanized steel detectable warning tiles in both wet-set and surface-applied configurations, giving project teams options for new construction as well as retrofit conditions.
Whichever system is selected, use the current product documents and installation instructions for the exact product being specified.
Don’t Stop the Review at the Tile Edge
The warning surface needs to be noticeable and properly located, but the surrounding walking surface still matters. Review the transition into and out of the tile, the condition of the pavement, drainage, and any joints or changes in material. On an existing approach, cracks, uneven concrete, or standing water may need attention before a surface-applied installation is finalized.
Visual contrast should also be considered as part of the complete installation. Evaluate the selected warning-surface color against the pavement that will actually surround it rather than looking at the tile color in isolation.
Rail Crossing Planning Checklist
Before the project moves into construction, use the following questions to make sure the detectable warning detail has been coordinated with the rest of the crossing:
- Is the pedestrian rail crossing separate from a street crosswalk, or is it part of one?
- Are pedestrian gates present, and has the warning surface been coordinated with their location?
- Does the pedestrian route connect clearly on both sides of the tracks?
- Does the warning surface location, depth, and width meet the requirements that apply to the project?
- Has visual contrast been considered against the actual surrounding pavement?
- What pavement material and condition will the warning surface be installed in?
- Does the selected TufTile product and installation method fit the construction conditions?
Rail crossings bring together several systems in a relatively small area. Planning the detectable warning surface alongside the gates, pavement, approach, and continuing pedestrian route gives the project team a much clearer picture of how the crossing will work as a whole—and helps resolve conflicts while they are still on paper.